How To Test Water Heater Thermostat
If you have been looking for a tutorial on how to test water heater thermostat, then this article is the right one for you.
You jump in the shower and realize that your hot water is not working anymore. You check the manual for directions, and it tells you to look at the thermostat.
However, you do not know how to test the thermostat to see if it is working or not. And in case the water heater thermostat is faulty, you probably do not know how to replace the water heater thermostat, not to even talk of knowing how to test hot water heater thermostat and cold water heater thermostat.
However, that is not something you have to worry about anymore because this article has all the answers for you.
When you discover that your electric water heater is not performing its job, there are two reasons why the water is not heating. The problem could be with a faulty heating element or the problem coming from the thermostat, which has become faulty.
In today’s article, we will take a step-by-step look at how you can test your water heater thermostat. It may sound harsh but trust me, and this is not hard. Let us get to how to check water heater thermostat.
Basics Of A Water Heater Thermostat
You can find your water heater’s thermostat under the access panel on the front side of the water heater tank.
The thermostat has to keep the water inside the tank hot.
And this is done by closing and opening contacts to turn the electricity that goes to the heating elements. These can be found inside the tank so that the water can get heated.
There is also a bi-metal switch on the wall of the water heater tank. When the water inside the tank starts getting hot, the steel tank will also get warm.
This will cause the bi-metal switch inside the thermostat to get heated. Suppose your water heater has been set to 120F, the recommended temperature. In that case, once the temperature reaches that limit, the bi-metal switch will open to cut the flow of electricity to the heating element of the water heater tank.
The bi-metal then does the opposite when the temperature drops from 120F by closing to allow electricity access to the heating elements inside the water tank.
How To Identify A Faulty Thermostat
Most of the water heater tanks with a capacity of 30 gallons or above usually use two elements, and each of these elements has its thermostats.
The thermostats have also been wired so that only one heating element will be on at a time.
The thermostat on the upper side brings a quarter of the water inside the tank to the temperature limit, and then it shuts down and sends the electricity over to the second thermostat, which is on the lower side.
Since the two thermostats are not the same, the water heater will react to it differently when one of them gets faulty and stops working.
How To Find Out The Thermostat That Failed
Before going ahead, you will need to identify that thermostat that has become faulty. Let us see how you can do that.
Upper Thermostat
If it has become faulty for the upper thermostat, the whole water heater will stop working altogether.
This is because it is the upper thermostat that controls the lower thermostat. So when the upper thermostat gets faulty and stops working, the lower thermostat will also stop working.
So when you see that the water heater is not working, the faulty thermostat is likely the upper one.
Lower Thermostat
If the lower thermostat has become faulty, you will see that the hot water is lukewarm or the hot water you usually have run out.
When the upper thermostat heats the top quarter of the tank, it will not heat its part when it is turned on since the lower thermostat is faulty.
How To Test The Water Heater Thermostat
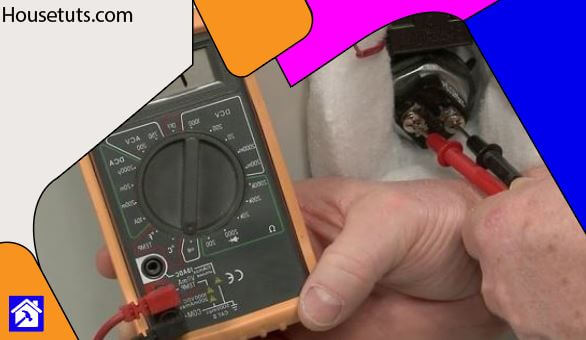
First of all, you will have to check for continuity. The tools you will need are a ‘Phillips’ and a flat head screwdriver and a multimeter.
Before you start working on the water heater tank, make sure that you have turned off the electricity before you proceed.
After turning the electricity off, check to see that the water heater’s power is also off before you proceed. Follow the steps below to turn the water heater off if you do not know how to do that.
- Turn the breaker off on the electrical panel
- Now remove the access cover of the thermostat
- Now, remove the insulation and plastic protective cover
- Use one of the multimeter probes to touch the grounded metal, like the unpainted metal housing of the tank
- Now, touch the other multimeter probe to the terminal of each of the thermostats and both of the heating elements
- The multimeter is supposed to show that there is no voltage at all.
So that is how to turn off the water heater before you proceed to work on it.
How To Test The Water Heater Thermostat For Continuity
Now that you have been able to turn the power off at the main control panel, you can now proceed to text the thermostats of your water heater. Below are the steps that you can use to get this done.
- Step 1
Check to see if the reset button is tripped or not. If that has happened, then reset it. You can now remove the wires from the thermostat, but you need to pay close attention to how they have been connected.
- Step 2
Touch it to the left side terminal near the reset button with one of the multimeter leads.
Now, touch the other multimeter leading to the other side of the reset button terminal. The multimeter reading should be close to zero to show that the thermostat has continuity. If the reading does not show that, then it means that the thermostat has become faulty and must be replaced.
Now do the same test to the right-side terminal of the thermostat’s reset button as well.
- Step 3
Now, run the same test on the lower portion thermostat. The multimeter should be reading close to zero ohms of resistance if the water inside the taker is below the temperature.
Now move the lower lead to the right heating element terminal. The reading on the multimeter should be showing a NO.
If the water inside the tank has risen above the temperature limit of 120F, you should see the opposite side of that.
If the thermostat is working fine, you will have to test the lower thermostat as well.
- Step 4
Now, disconnect the power wires of the second thermostat, which is the lower thermostat.
Touch each of the leads to each of the terminals. If the water temperature is below the limit of 120F, the multimeter will read close to zero ohms of resistance.
However, if the water temperature is above the limit of 120F, the multimeter will read no continuity. If the reading is the opposite, it will mean that the thermostat is faulty.
How To Purchase A Water Heater Thermostat
If you find out that one of your thermostats has been damaged, you will have to replace it. It is, however, advisable to replace both of the thermostats. You can purchase thermostats alone or in a kit.
Purchasing A Tune-up Kit
You can consider purchasing a tune-up kit that will include the upper and the lower thermostat along with two new heating elements.
It may be a bit expensive. However, you will notice there is now a difference in how your water is. This is good if your water heater has a few more years of service.
You can get a tune-up kit from Rheem for your electric water heaters. If you decide to replace the heating elements, you will have to make sure that the heating elements are the correct size and type for the kind of water heater you are using.
Buying The Upper Or Lower Thermostat Alone
If you decide to replace the thermostat that has become faulty, you can do so, although we recommend that you replace both of them together.
However, your budget may force you to replace only the faulty thermostat most of the time. This is true, especially when you have plans for a new water heater, so all you are trying to do is get the old one up and running in the meantime.
You can go in for the Camco 8123 to replace the lower thermostat, and the Camco 8123 is a less expensive option. Or you can go in for a thermostat made by Rheem if you like paying more dollars for your thermostat.
Single Element Water Heater
We just looked at double-element water heaters. However, there are some water heater tanks with a capacity of about 20 gallons of water or below that use just a single heating element.
Such water heaters have been wired differently and use only a single thermostat. Although they may look similar to the dual upper thermostat, they come with a few wire terminals.
Replacing The Water Heater Thermostat
It is pretty easy to replace your water heater’s thermostat, and it is something that you can do by yourself without any issues at all. However, most people would prefer to hire a professional to handle the job, which is also an excellent idea. If you are not confident about something, there is no need to go ahead with it.
When replacing the water heater thermostat, you will need the Phillips tool and the flatbed screwdriver along with the multimeter again.
You will also need your new thermostat on hand for the job. You will first need to put out the water heater’s power, and you can refer to the steps in ‘how to test your water heater thermostat’ to turn the power off.
After turning the power off, please follow the steps below to replace the water heater thermostat.
- Disconnect the wires of the thermostat. Look carefully at how they have been connected to the thermostat because you will have to connect them to the new thermostat.
- Lift the old thermostat out of the retaining bracket with care
- Put the new thermostat inside the retaining bracket carefully.
- Make sure that the thermostat is the right one for your water heater.
- Make sure that the back of the thermostat is tightly against the tank.
- Now, reconnect the wires you disconnected from the old thermostat and replace the protective cover over the new thermostat.
- Adjust the temperature setting to 120F and then replace the insulation cover
- Now, turn on the water heater power.
And now, you are done replacing the old thermostat in your water heater tank with a new thermostat. As you can see clearly, it was not a hard job at all, and almost anyone can carry this out.
Frequently Asked Questions
How can I reset a water heater thermostat?
If you tripped the thermostat, you have to open the access cover on the front side of the tank and take out the insulation. You will then see a red button on the thermostat.
Push that button to reset it. If it trips again, you are probably dealing with a more significant problem now.Why does a thermostat trip?
A thermostat can trip due to several reasons. However, the most common is when the thermostat becomes faulty or when a heating element becomes faulty. A faulty reset button can also cause tripping. You can contact a professional plumber to look at your thermostat if you think something is wrong with it.
Conclusion
So this article has been all about how to test the water heater thermostat, the basics, how to identify a faulty thermostat, how to test a thermostat on a water heater, and all the topics surrounding water heater thermostat.
As you can see, it is not hard to get it replaced. You can do all these by yourself. However, if you are still not confident enough, you can call a professional plumber to take care of everything for you.
You can check out our related article covering how to install a range hood and everything you need to know about egress windows.


